Creating, Sending And Tracking An Email Is Easy with Email Networks
Create A New Email Message
How to use your own custom HTML to create an email
To create a blank email:
- Click the Messages folder
- Click Create New Message
- Click Blank Email to create an email from scratch
- OR click Paste in Your Code if you want to directly paste your HTML code into the editor.
- To preview your email in the WYSIWYG editor after pasting in your HTML code, click Source
- Click Save
Insert Email Content
- Type in the Subject and Name of your email
- Enter the body of your email in the large box. You can format it using the tools below.
- To save your progress, click Save. Or, when complete, click Save and Close.
- To send a test email, click the Send Test Email button.
Familiarize yourself with the basic editor controls:
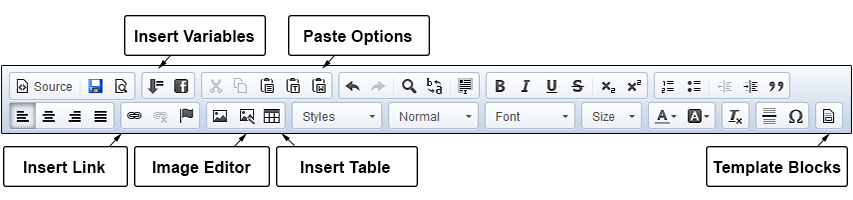
You can edit the email using HTML by clicking on the Source button on the top left of the toolbar.
Spam Report / Link Verification Tool
You can also check the quality of your email to find broken links and check for spam indicators. To do this:
- Click Test, then Spam / Link Check. The dialogue box appears letting you know the results of the test. You will receive a spam score based on a scale of 100.
How to Insert an Image into Your Email Message
Use our insert image tool to add an image.
Insert a Custom Field
You can add a new custom field under the subscriber menu area. Use the add a custom field tool for proper “text” to add.
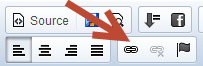
Insert a link within the body of your email
- Highlight the text that you would like to link and then click on the Link icon.
Send An Email Message
Test Send
Please make sure to test before making a live send. Different email clients render HTML in different ways, so you’ll want to send yourself test emails before sending a live email message to your subscribers.
To send yourself a test message:
- Open the message in the Messages folder
- Click the Test button in the top right corner of the message editor
- Enter your email address (up to 5 test emails can be sent from this window)
- Optional Features
- Impersonate Recipient: enter a subscriber’s email address in order to receive this test send as if you were that subscriber. It will populate the mail merge variables with this subscriber’s information
- Add a Note that will be added to the top of the test messages
- Click Send
Inbox Preview
Preview your email in 65 combinations of the most popular email clients and mobile devices. Run an Inbox Preview. Contact you account manager if not enabled at support@emailnetworks.com
Send an Email Message
- Click the Messages folder in the left-side menu
- Click the Message Folder
- Click the message you want to send from the list shown on the right
- Click the Send Message button
- Select the desired “From Name” from the drop-down
- Choose the desired list(s) by checking the box(es)
- Note: Each subscriber will only receive one copy of an email message, regardless of the number of selected lists that subscriber may be on
- Lists are pulled at the time the email is actually sent. This means that the estimated send size can change if new people are added to the list, subscribers unsubscribe, etc.
- Click Send Immediately or select a date and time to send
- Optionally edit the Advanced Options by clicking the arrow next to “Advanced Options”: select a Footer or enable Google Analytics™ Link Tracking
- Click Next
- Check the box to confirm your selections are correct
- Click Send Email
Tracking An Email Message
To view all tracking details for an email send, follow these steps:
- Click the Reports Folder
- Click Email Tracking
- Highlight the email campaign you’re seeking
- Click the View Tracking Report button
- Download a PDF version of the report by clicking Export
- Click the tabs to view and download detailed report information:
- Unique Opens: lists all subscribers who opened this email and how many times they opened it
- Links Clicked: lists all links that were clicked and the total number of times the links were clicked
- All Opens: lists all subscriber opens, organized by date
- Who Clicked: lists all subscribers who clicked this email and the links they clicked
- Unsubscribes: lists all subscribers who chose to unsubscribe after reading this message
- Hard Bounces: lists all email address that could not receive the message due to permanent conditions
- This typically results when an email address no longer exists or is inactive
- SoftBounces: lists all email addresses that are valid, but the message couldn’t be delivered most likely due to a temporary encumbrance
- If you would like to view a visual representation of where subscribers clicked on a message, click the message once and then click View Click Overlay
Please contact support at (866) 271-5908 or email support@emailnetworks.com for assistance.